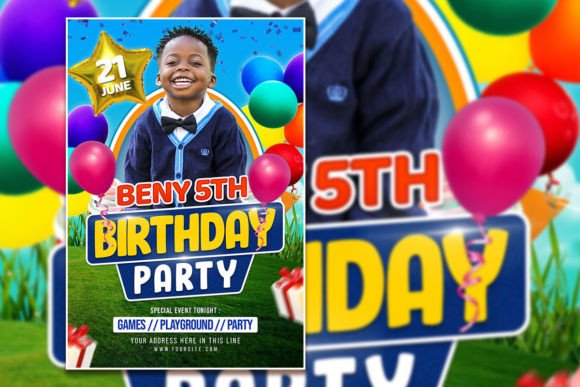
Kids Birthday Party Flyer: Designing the Perfect Invitation
There’s a certain kind of magic that happens when a child sees their name printed in big, bold letters on a party invitation. It transforms a simple get-together into a major event. As a designer, event planner, or parent, capturing that excitement before the party even starts is the real goal. We often spend hours trying to find the right vibe, mixing and matching colors and fonts in hopes of striking gold. But what if the heavy lifting was already done for you? Enter the fully editable Kids Birthday Party Flyer or Poster template—a versatile design asset that bridges the gap between professional quality and personal customization.
Beyond the Blank Canvas: Why Editable PSD Templates Matter
If you’ve ever stared at a blank artboard in Adobe Photoshop, you know the paralysis of choice. Do you go with a serif font for elegance or a script font for playfulness? Should the layout be grid-based or organic? This specific birthday celebration template eliminates the guesswork while keeping the creative control firmly in your hands.
At its core, this isn't just a static image; it is a layered Photoshop (PSD) file designed for flexibility. The structure is built on a high-resolution 2000 x 3000 pixel canvas with a 300 dpi resolution. For those not deep in technical specs, that simply means your final product will look crisp on a computer screen and incredibly sharp when printed. Whether you are creating a poster to hang in a living room or a digital graphic to share on Instagram, the quality remains uncompromised.
The true power lies in the organized layers. Unlike flattened JPEGs where you are stuck with the original text, this template allows you to isolate every single element. You can swap out the background color to match a specific party theme—maybe "Midnight Blue" for a space explorer party or "Pastel Pink" for a garden tea party. You can adjust the opacity of decorative elements or move them around to frame your text better. It is a premium design asset that respects your time and your need for a professional finish.
The Art of Typography in Party Invitations
When designing for children, typography does more than just convey information; it sets the emotional tone. A Kids Birthday Party Flyer or Poster needs to scream "fun" the moment someone looks at it. This usually involves a mix of display fonts and legible body text.
Display typefaces are the heavy lifters here. They are the big, decorative headers that grab attention. However, a common pitfall in editorial design and invitation design is prioritizing style over readability. If the parents can’t read the address or the RSVP date because the font is too swirly, the invitation fails its primary job.
This is where the template’s structure shines. It likely utilizes a balanced font pairing strategy. You might see a bold, handwritten font for the headline—perfect for that casual, joyful vibe—paired with a clean sans-serif font for the details. This contrast ensures that the critical information (the "Who, What, When, Where") is instantly digestible.
Because the file is editable, you aren't locked into the original font choices. If you have a specific brand identity you are working with—perhaps you are a children’s party planner or a small business owner selling party supplies—you can select the text with the text tool and replace it with your own brand typeface. This ability to customize typography is crucial for maintaining visual consistency across all your marketing materials.
Practical Applications: More Than Just a Flyer
While the primary use case is an invitation, thinking of this asset strictly as a "flyer" limits its potential. In the world of small business marketing and content creation, versatility is king. Here is how you can repurpose this single template to serve multiple functions:
- Social Media Graphics: In the age of digital invites, a static image is often the first point of contact. You can resize the design for Instagram Stories or Facebook Event covers. The RGB color mode ensures that the colors pop on screens, which is essential for catching a scrolling thumb.
- Digital Products & Blog Assets: If you run a parenting blog or a lifestyle website, you could use the design as a downloadable freebie for your readers. It adds value to your digital products portfolio without requiring you to hire a graphic designer from scratch.
- Physical Decor & Merchandise: Because the file is high-resolution, you can print it on more than just paper. Think about packaging design for party favors, stickers, or even a t-shirt for the birthday child. The creative font styles used in the template translate well to merchandise.
- Logo Design Inspiration: While you wouldn't use a template as a final logo, the arrangement of elements can serve as a mood board or a starting point for brand identity development for a new children’s brand.
Step-by-Step: Customizing Your Design
One of the biggest barriers to entry for high-quality design is often the software learning curve. However, editing this PSD template is designed to be intuitive, even for those with only a basic understanding of Adobe Photoshop.
The process is straightforward. You begin by opening the PSD file. The first thing you will notice is the organized layer panel. Good designers label their layers, making it easy to find "Background," "Text Layer 1," "Confetti Overlay," etc.
To change the photo—which is highly recommended for that personal touch—you simply locate the smart object layer designated for the image. You double-click it, paste your own high-quality photo of the birthday child, save, and close the smart object. The template automatically wraps your photo into the pre-set shape or frame, complete with any filters or lighting effects already applied to the template.
Next, grab the Text Tool. Click on the headline. You can change the wording from "Join us for a party" to "Lucas is turning 5!" If you want to change the font, you simply highlight the text and select a new typeface from your font library. This is particularly useful if you are looking to match a specific modern typography style or if you are adhering to a strict brand identity guide.
Ensuring Professional Results
Even with a premium font and a great photo, a few design principles can take your flyer from "good" to "unforgettable." When customizing your Kids Birthday Party Flyer or Poster, keep these tips in mind:
- Visual Hierarchy: Ensure the most important information is the largest. The birthday child's name and the date should be the first things people see. Don't let the decorative elements overshadow the message.
- Whitespace Management: It can be tempting to fill every inch of the poster with graphics. Resist the urge. Let the design breathe. Whitespace helps guide the eye and makes the readability of your text much higher.
- Color Psychology: Since the template uses RGB mode, be mindful of how colors look on screen versus print. If you are planning to print this at home or at a shop, it is always wise to do a test print. Neon colors on screen can sometimes look muddy on paper depending on the printer quality.
- Commercial Licensing: If you are a designer creating this for a client, or a small business owner using it for a promotional event, always double-check the licensing of the assets included in the template. Ensure you have the rights to use the fonts and images in a commercial capacity if you aren't using your own.
Final Thoughts on Creative Assets
In a fast-paced world where visual content drives engagement, having a library of high-quality, editable assets is a game-changer. A Birthday Celebration Flyer Template is more than just a convenience; it is a professional tool that empowers you to produce marketing assets and print materials that rival agency work. Whether you are a hobbyist making a flyer for your niece or a content creator building a suite of digital products, the ability to instantly download, customize, and deploy a beautiful design is invaluable. It allows you to focus on what really matters: celebrating the moments that count.